When you’re working with graphics, you’ll more than likely find yourself working in Photoshop at some point. Adobe Photoshop is perhaps the most well-known, popular graphic design software in the world and as such, it has been an industry leader for decades.
That doesn’t mean it’s easy to learn how to use. Or that using it is intuitive. Many designers find themselves running into problems when they’re learning how to work with Photoshop. And for a lot of those designers, the difficulties don’t stop once they’re proficient in the program. One of the most common difficulties designers face is working with vector images in Photoshop.
If you’re familiar with Photoshop, you probably know the program was designed to work with raster images. But did you know it can also work with vector images? It’s not exactly common knowledge, but it is knowledge that can completely change how you work with the program and the kinds of images you source. Read on to learn how to use vector images in Photoshop (we promise it’s not that difficult!)
Vector vs. Raster Images
Before we get into how you can use vector images in Photoshop, we want to go over the differences between vector and raster images.
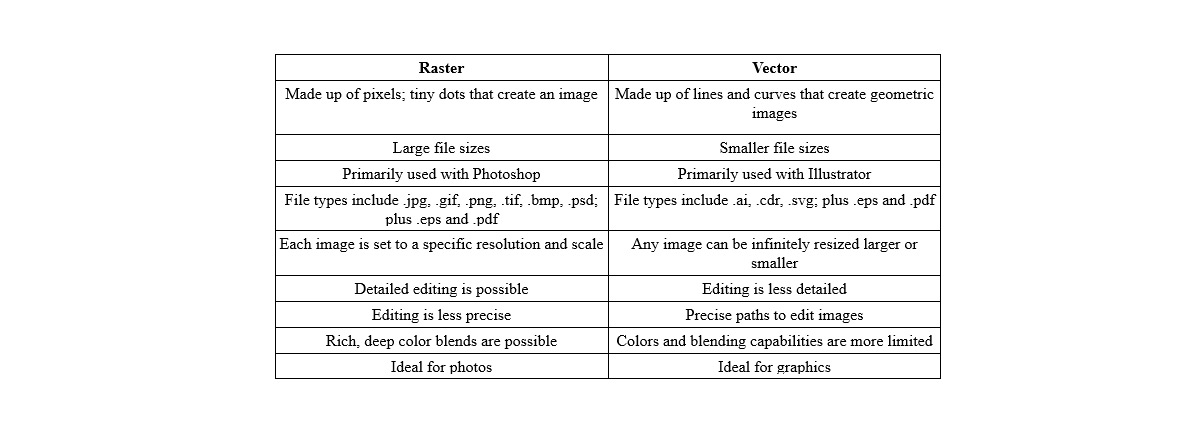
Raster images are images composed of tiny dots, also known as pixels, on your screen. Raster images are also known as bitmap images. The more pixels an image has, the clearer it is. This clarity is known as the image’s resolution.

A vector image is an image crafted through lines, shapes and other geometric components. These geometric components form images through their unique mathematical formulas.

So why would you want to use a vector image instead of a raster image? To resize it easily. Because of how they’re constructed, raster images can’t easily be resized. When you try to resize a raster image, it can stretch, warp and become pixelated, ruining your image. A vector image, on the other hand, can easily be resized because the mathematical formulas that comprise it remain the same and retain the same relationship to each other no matter how large or small you make it.
That doesn’t mean a vector file is the perfect choice for every image, though. Raster images have the capacity to be much more detailed, which makes them great for photographs and other high quality images. Vectors, on the other hand, are ideal for logos are other graphics, primarily because of their scalability.
Read more about vector images with our in depth article about vector files
Opening Vector Images in Photoshop
Opening a vector image in Photoshop is actually quite easy. Just follow these steps:
1. Click the “File” menu in the menu bar
2. Click “Open as Smart Object”
3. Choose the EPS or AI file you want to open and click “Open”
4. Set a resolution for the image
And that’s it. You’ve now got a vector image opened in Photoshop.
Now what?
Now you can scale your vector image up and down without losing quality. That’s the primary benefit of turning your vector image into a Smart Object. Other things you can do with a Smart Object include skewing it, warping it, rotating it and adjusting the perspective from which you view it. No matter what you do with your Smart Object, you don’t lose the image’s original data. This is the entire point of a smart object - to allow you to make changes to an image’s size and dimensions without altering its core data.
Working with Vector Images in Photoshop
Once you’ve got your vector image open as a Smart Object, you’re free to edit it as you see fit without making irreversible changes. Working with the image as a Smart Object won’t impact the image quality, which isn’t the case when you’re working with an image as a regular object. Take a look at these examples:
See the difference? You need this kind of functionality if you want to resize images like logos to fit onto different backgrounds. Think about it - you’ve got your logo and you need it to look equally great on a business card, stationery, a Facebook cover photo, an Instagram profile picture, a t-shirt...to make that happen, you have to be able to resize it easily without sacrificing picture quality.
If your vector images is in a .pds format and you’re using shape layers, you can edit the image. Otherwise, you can also make edits to your image by opening the file in Adobe Illustrator. This is actually recommended if you’re planning on doing a significant amount of edits to your vector image, because Illustrator is equipped for graphic editing, whereas Photoshop is primarily for editing photos.
And if you need to convert your image to a raster, you can do that too. Just click on “Layer,” then “Smart Objects,” then “Rasterize” and you’ll have your current image in raster form, ready to continue editing.
Why would I Rasterize my Vector Image?
There are certain design processes that are easier to do on raster images...and some that can only be done with raster images. These include:
- Highlighting
- Airbrushing
- Correcting colors
- Smoothing and blending
Overall, if you want to create photorealistic images, they need to be raster files. Do this when you need to create high quality images. If you need to resize your image, you can always take your edited raster image and turn it into a vector using the process outlined above.
Keep in mind that if you plan to print, you’ll want to print the vector version of your image - because they’re composed of lines and curves, rather than pixels, they’re more optimal for printing in most cases.
Using Raster and Vector Images
Knowing when to use a raster and when to use a vector image can be confusing. The fortunate thing is, it’s easy to switch between the two file types to use an image as you need it.
Here’s a quick guide to what each type of image does best to help you determine which you need for each specific job:

As a designer, it’s valuable for you to be an expert in both Photoshop and Illustrator. This way, you can easily switch between raster and vector images as necessary and explore both image types’ full capabilities. After all, your brand shouldn’t just have one image in its asset library - your logo is important, but so are your website graphics, your social media images and the photos you use in your marketing. Every image should be optimized to look its best, and for each image, that means working with, not against, the restrictions that come with its file type.
Editing your Logo Further
When you get a logo from Logogenie, it’s a vector file. You might not want or need to edit it in Photoshop, but in case you do, you’ll need to open it as a Smart Object. There are other ways to work with vectors in Photoshop, but working with them as Smart Objects is the easiest, more effective way to do so.
When you need to make significant changes to your logo, the easiest path is most likely to edit it in the Logogenie editor itself. Everything you used, from the fonts to the graphics to the shape of your logo, is already part of our editor and can easily be swapped out. Save Photoshop for resizing and the kind of editing that’s best suited for raster images, like subtle blending and color correction.
Design a logo with the perfect colors for yourself
If you don’t have spare cash in your budget for a logo, don’t despair. While in the past you may have had limited options, nowadays technology has advanced so that virtually anyone can design their own logo using an online logo design tool like logogenie.
In our digital era, design software is less about the technical skill of your hands and more about your creative ideas. You don’t need to master your brush strokes or pencil shading — you don’t even need steady hands. With digital logo makers, all you need is an idea.
Logogenie, and other online design tools, use templates to make design fast and easy, even for first timers. First, you select your industry from the dropdown menu.

We’ve categorized our templates by the needs and demands of the top industries, so finding yours is the first step. Our algorithm will then generate the top choices for your industry.
Simply choose the one you like and start editing. You can customize each template however you want, personalizing your choices for:
- Main images
- Company name and slogan
- Font and typography
- Color schemes
- Text and picture sizes
- Text and picture placement
- Adding new icons
- Layering (putting some images behind or in front of others)
You can choose from our internal library of over 200 icons. A quick glance shows that there are plenty of the intellectual imagery we mentioned above, including trees with rainbow leaves, shield crests, books, graduation caps, and more.
Using a DIY logo maker like logogenie, you can create a professional-tier logo in just minutes. When you’re done, you can buy all permissions and commercial licensing for $24.90, which grants you your logo forever.
While the template-style of design works well for first-timers, you’ll get better results if you bone up on some graphic design basics beforehand. Keep reading our blog for special design tips, straight from expert designers.


